CAS Server的部署手记
2012-07-13 12:27:01 来源: 评论:0 点击:
访问URL:https://sso-cas.5iops.com:8443/casServices Management Console:https://sso-cas.5iops.com:8443/cas/services域名启用前...
访问URL: https://sso-cas.5iops.com:8443/cas
Services Management Console: https://sso-cas.5iops.com:8443/cas/services
域名启用前需要手动在hosts里添加映射 "sso-cas.5iops.com 10.10.10.105"
Services Management和AD bind帐号
帐号 ssoservice
密码 secret
软件版本:
SunJDK1.6 + Tomcat6.0 + Mysql5.5
CAS3.4.11 Final
服务器地址及功能列表:
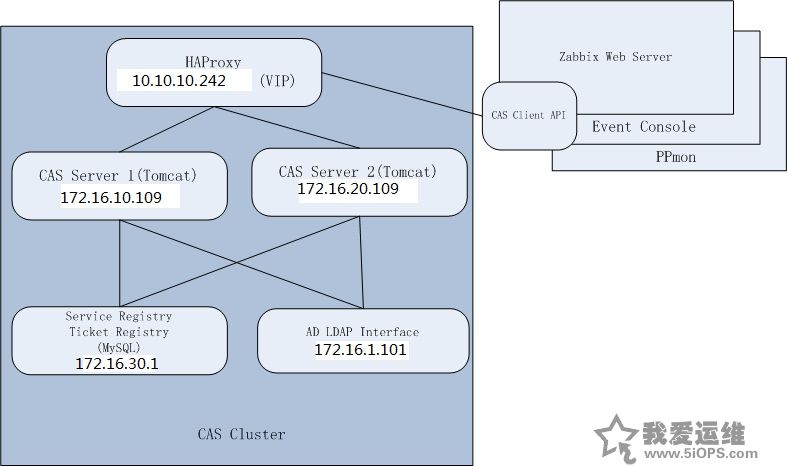
10.10.10.242 (vip) HAproxy通过反向代理实现后端2台Tomcat Server的负载均衡,高可用。
172.16.10.109 & 172.16.20.109 CAS Server (Tomcat)
172.16.30.1 Mysql, 用来存放ServiceRegistry和TicketRegistry
CAS Server部署路径:
Tomcat安装路径: /usr/local/tomcat
cas web路径: /home/pplive/web/cas
日志路径: /home/logs/tomcat
Tomcat重启:
1.登录到 172.16.10.109 & 172.16.20.109 sudo到root
2.停止:/etc/init.d/tomcat stop (有时shutdown不起作用,需要手动kill掉进程)
3.启动: /etc/init.d/tomcat start
Tools CAS架构图:

CAS Server部署详细步骤:(需要Maven2.0+)
- 安装jdk1.6 + tomcat6.0 + mysql5.5,并在/etc/profile里加入如下环境变量设置:
- JAVA_HOME="/usr/java/default/"
- CLASS_PATH="$JAVA_HOME/lib:$JAVA_HOME/jre/lib"
- PATH=".:$PATH:$JAVA_HOME/bin:/usr/local/maven/bin"
- CATALINA_HOME="/usr/local/tomcat"
- export JAVA_HOME CATALINA_HOME
- 官网下载并解压cas version 3.4.11 Final并解压到本地目录,比如D:\cas-server-3.4.11
- 编辑cas-server-webapp\pom.xml,加入如下dependency: (ldap支持包)
- <dependency>
- <groupId>${project.groupId}</groupId>
- <artifactId>cas-server-support-ldap</artifactId>
- <version>${project.version}</version>
- </dependency>
- 在cas-server-3.4.11目录执行mvn install package 重新打包。
- 将D:\cas-server-3.4.11\cas-server-webapp\target\cas.war 上传至10.208.101.16:/usr/local/tomcat/webapp 。
- 为Tomcat生成安全证书:
- 生成密钥对
- keytool -genkey -alias tomcat-server -keyalg RSA -keypass changeit -storepass changeit -keystore server.keystore
- 将服务器证书导出为证书文件:
- keytool -export -alias tomcat-server -storepass changeit -file server.cer -keystore server.keystore
- 将上述步骤所得到的tomcat根目录下server.cer导入到cacerts 文件中,cacerts文件默认生成在tomcat根目录下
- keytool -import -trustcacerts -alias server -file server.cer -keystore cacerts -storepass changeit
- 在tomcat根目录下找到cacerts文件,拷贝到<JAVA_HOME>\jre\lib\security
- 查看生成的证书: keytool -list -v -keystore /usr/java/default/jre/lib/security/cacerts
- 注意: 生成证书的用户名要使用机器的名字(FQDN)
- 生成密钥对
- 为Tomcat开启https,修改Tomcat配置,/usr/local/tomcat/conf/server.xml, 加入如下connector配置:
- <Connector port="8443" protocol="HTTP/1.1"
- maxThreads="150" scheme="https" secure="true" SSLEnabled="true"
- clientAuth="false" sslProtocol="TLS"
- keystoreFile="server.keystore" keystorePass="changeit" />
- 其中keystore文件要指定为step6生成的server keystore,密码要和生成keystore的密码一致。
- 将Windows AD ldaps的证书加入本地JVM信任列表(需要用到一个叫做InstallCert的java工具)
- 下载InstallCert.class ,放到/tmp ,执行javac InstallCert.class 编译成InstallCert.java
- 执行java InstallCert 192.168.0.201:636 (参数是ldaps server名字和端口)
- 根据提示,选择将证书加入信任的keystore,会生成jssecacerts文件 .
- 将jssecacerts拷贝至<JAVA_HOME>\jre\lib\security
- 启动tomcat /usr/local/tomcat/bin/startup.sh ,此时应该可以通过https://10.208.101.16:8443/cas 访问cas登录入口,但因为还未配置ldaps连接信息,因此还无法通过域账号登录。
以下是ldaps相关配置,主要参考: https://wiki.jasig.org/display/CASUM/LDAP - 编辑/usr/local/tomcat/webapps/cas/WEB-INF/deployerConfigContext.xml, 将ldaps连接信息加入ContextSource:
- <bean id="contextSource" class="org.springframework.ldap.core.support.LdapContextSource">
- <!-- DO NOT enable JNDI pooling for context sources that perform LDAP bind operations. -->
- <property name="pooled" value="false"/>
- <!--
- Although multiple URLs may defined, it's strongly recommended to avoid this configuration
- since the implementation attempts hosts in sequence and requires a connection timeout
- prior to attempting the next host, which incurs unacceptable latency on node failure.
- A proper HA setup for LDAP directories should use a single virtual host that maps to multiple
- real hosts using a hardware load balancer.
- -->
- <property name="url" value="ldaps://172.16.1.101:636" />
- <!--
- Manager credentials are only required if your directory does not support anonymous searches.
- Never provide these credentials for FastBindLdapAuthenticationHandler since the user's
- credentials are used for the bind operation.
- -->
- <property name="userDn" value="admin@5iops.com"/>
- <property name="password" value="secret" />
- <!-- Place JNDI environment properties here. -->
- <property name="baseEnvironmentProperties">
- <map>
- <!-- Three seconds is an eternity to users. -->
- <entry key="com.sun.jndi.ldap.connect.timeout" value="3000" />
- <entry key="com.sun.jndi.ldap.read.timeout" value="3000" />
- <!-- Explained at http://download.oracle.com/javase/1.3/docs/api/javax/naming/Context.html#SECURITY_AUTHENTICATION -->
- <entry key="java.naming.security.authentication" value="simple" />
- </map>
- </property>
- </bean>
这里主要的配置是黄色底的部分,即配置server地址,端口和一个用来做search的bind用户信息。
- 在authenticationManager这个bean的authenticationHandlers属性里,注释掉SimpleTestUsernamePasswordAuthenticationHandler, 加入FastBindLdapAuthenticationHandler:
- <bean class="org.jasig.cas.adaptors.ldap.FastBindLdapAuthenticationHandler"
- p:filter="%u@5iops.com"
- p:contextSource-ref="contextSource"/>
- <bean class="org.jasig.cas.adaptors.generic.FileAuthenticationHandler"
- p:fileName="file:/usr/local/tomcat/webapps/cas/file_of_passwords.txt" />
- 重启Tomcat,现在应该可以通过windows域账号登录CAS主页面了。
以下为Services Management页面的配置,参考:( https://wiki.jasig.org/display/CASUM/Services+Management) - 配置Servicse Management 页面为http://cas.5iops.com:8443/cas/services
- 在cas.properties里配置CAS url,域名必须和生成证书的用户名一致,否则无法访问service management页面
- server.prefix=https://cas.5iops.com:8443/cas
- 在deployerConfigContext.xml里配置访问service management的用户:
- <sec:user-service id="userDetailsService">
- <sec:user name="opstools" password="notused" authorities="ROLE_ADMIN" />
- </sec:user-service>
- 这里设置了opstools这个用户可以访问services management页面。 这个用户暂时使用step 11配置的文件认证。
- 在cas.properties里配置CAS url,域名必须和生成证书的用户名一致,否则无法访问service management页面
- 默认Service management配置采用InMemoryServiceRegistry,重启Server后配置丢失,可以使用数据库来做data的persistent。这里我们使用Mysql:
- 在cas-server-webapp的pom.xml里加入如下dependency并用maven打包:
- <dependency>
- <groupId>commons-dbcp</groupId>
- <artifactId>commons-dbcp</artifactId>
- <version>1.4</version>
- <scope>runtime</scope>
- </dependency>
- <dependency>
- <groupId>org.hibernate</groupId>
- <artifactId>hibernate-entitymanager</artifactId>
- <version>3.5.0-CR-2</version>
- </dependency>
- <dependency>
- <groupId>mysql</groupId>
- <artifactId>mysql-connector-java</artifactId>
- <version>5.1.18</version>
- </dependency>
- 将新生成的对应jar包,上传到 /usr/local/tomcat/webapp/cas/WEB-INFO/libs/
- 参照 https://wiki.jasig.org/display/CASUM/Configuring加入ServicesRegistry和Database Connection的配置
以下步骤配置attribute release,即Ad Server用户属性到CAS用户属性的映射(service可以访问的属性是在Services Management页面控制的),详细配置参考:https://wiki.jasig.org/display/CASUM/Attributes
- 在cas-server-webapp的pom.xml里加入如下dependency并用maven打包:
- 添加CredentialsToLDAPAttributePrincipalResolver用来从ldaps搜索用户名,并解析成用户的id:
- <property name="credentialsToPrincipalResolvers">
- <list>
- <bean class="org.jasig.cas.authentication.principal.CredentialsToLDAPAttributePrincipalResolver">
- <!-- The Principal resolver form the credentials -->
- <property name="credentialsToPrincipalResolver">
- <bean class="org.jasig.cas.authentication.principal.UsernamePasswordCredentialsToPrincipalResolver" />
- </property>
- <!-- The query made to find the Principal ID. "%u" will be replaced by the resolved Principal -->
- <property name="filter" value="(sAMAccountName=%u)"/>
- <!-- The attribute used to define the new Principal ID -->
- <property name="principalAttributeName" value="sAMAccountName" />
- <property name="searchBase" value="dc=5iops,dc=com" />
- <property name="contextSource" ref="contextSource" />
- <property name="attributeRepository">
- <ref bean="attributeRepository" />
- </property>
- </bean>
- <bean class="org.jasig.cas.authentication.principal.UsernamePasswordCredentialsToPrincipalResolver" />
- ..................
- 配置attributeRepository用来存放从ldap取回来的用户属性,并映射到本地变量:
- <bean id="attributeRepository" class="org.jasig.services.persondir.support.ldap.LdapPersonAttributeDao">
- <property name="contextSource" ref="contextSource" />
- <property name="baseDN" value="dc=5iops,dc=com" />
- <property name="requireAllQueryAttributes" value="true" />
- <property name="ldapTemplate" ref="ldapTemplate" />
- <!--
- Attribute mapping beetween principal (key) and LDAP (value) names
- used to perform the LDAP search. By default, multiple search criteria
- are ANDed together. Set the queryType property to change to OR.
- -->
- <property name="queryAttributeMapping">
- <map>
- <entry key="username" value="sAMAccountName" />
- </map>
- </property>
- <property name="resultAttributeMapping">
- <map>
- <!-- Mapping beetween LDAP entry attributes (key) and Principal's (value) -->
- <entry key="sAMAccountName" value="Name"/>
- <entry key="mail" value="Mail" />
- </map>
- </property>
- </bean>
- <bean id="ldapTemplate" class="org.springframework.ldap.core.LdapTemplate">
- <constructor-arg ref="contextSource" />
- <property name="ignorePartialResultException" value="true" />
- </bean>
- 其中在ldapTemplate里配置的ignorePartialResultException=Ture很重要,缺少这个配置会导致Server报错。
以下是TicketRegistry的配置,这是做CAS Server高可用性的前提。实际环境采用的JpaTicketRegistry, 详细配置方法参考:https://wiki.jasig.org/display/CASUM/JpaTicketRegistry
- 参照https://wiki.jasig.org/display/CASUM/JpaTicketRegistry 配置JpaTicketRegistry,实际环境使用的mysql数据库,配置按照mysql做相应变动过即可。
部署过程中遇到的问题及解决办法:
1. 碰到java.lang.NoSuchMethodError: org.hibernate.mapping.SimpleValue.<init> 错误,原因是使用hibernate-core-3.6.0.Final, 又引入了hibernate-annotations.jar,在3.6.0.Final中已经包含了annotations和jmx的支持,不需要另外导入, 删除WEB-INFO/lib/下的hibernate-annotations-3.5.6-Final.jar这个包即可解决。
2.第一次启动服务的时候无法在mysql里自动创建Serivces Registry和Ticket Registry所需的表。原因是设置mysql的dialect设置成了MysqlInnoDBDialect。 先设置成MySQLDialect,启动服务器后会自动创建表格,之后可以再改回来。
分享到:
 收藏
收藏
评论排行
- ·Windows(Win7)下用Xming...(92)
- ·使用jmx client监控activemq(20)
- ·Hive查询OOM分析(14)
- ·复杂网络架构导致的诡异...(8)
- ·使用 OpenStack 实现云...(7)
- ·影响Java EE性能的十大问题(6)
- ·云计算平台管理的三大利...(6)
- ·Mysql数据库复制延时分析(5)
- ·OpenStack Nova开发与测...(4)
- ·LTPP一键安装包1.2 发布(4)
- ·Linux下系统或服务排障的...(4)
- ·PHP发布5.4.4 和 5.3.1...(4)
- ·RSYSLOG搭建集中日志管理服务(4)
- ·转换程序源码的编码格式[...(3)
- ·Linux 的木马程式 Wirenet 出现(3)
- ·Nginx 发布1.2.1稳定版...(3)
- ·zend framework文件读取漏洞分析(3)
- ·Percona Playback 0.3 development release(3)
- ·运维业务与CMDB集成关系一例(3)
- ·应该知道的Linux技巧(3)


